


原计划本系列的四篇都已经发表了,分别是“先跑篇”、"配置篇"、“实战篇”和“进阶篇”,现在已经入冬,我们这个秋天的系列将以两篇“优化篇”结束,带您牵手OpenCV,进入OpenCV的广阔世界。
voidcv::resize(InputArray_src,OutputArray_dst,Sizedsize
double inv_scale_x, double inv_scale_y, int interpolation )CV_OCL_RUN(_src.dims()<=2_dst.isUMat()_src.cols()>10_src.rows()>10
ocl_resize(_src, _dst, dsize, inv_scale_x, inv_scale_y, interpolation))CV_PXP_RUN(_src.dims()<=2_dst.isMat()(interpolation==INTER_LINEAR),
resize_pxp(_src,_dst,dsize,inv_scale_x,inv_scale_y)#ifdef HAVE_PXP
int resize_pxp(cv::InputArray _src, cv::OutputArray _dst, cv::Size dsize, float fx=0, float fy=0, int rotateCode=-1, int flipCode=-2);
#define CV_PXP_RUN_(condition, func, ...) \
try \
{ \
if((condition)func) \
{ \
return__VA_ARGS__; \
} \
} \
catch(constcv::Exceptione) \
{ \
CV_UNUSED(e); /*TODO:Addsomelogginghere*/ \
}
#else
#define CV_PXP_RUN_(condition,func,...)
#endif
#define CV_PXP_RUN(condition,func) CV_PXP_RUN_(condition,func)#include “opencv2/opencv.hpp”
using namespace cv;
/**************************************************************
construct the pxp class
**************************************************************/
class pxp_handler{
public:
pxp_handler();
int resize(cv::InputArray _src, cv::OutputArray _dst, cv::Size dsize, float fx=0, float fy=0, int rotate_code=-1, int flip_code=-2);
};pxp_handler::pxp_handler(){
pxp_init();
}
static inline void* get_pxp_handler(){
static pxp_handler s_pxp_handler;
return (void*)(s_pxp_handler);
}
int resize_pxp(cv::InputArray _src, cv::OutputArray _dst, cv::Size dsize, float fx=0, float fy=0, int rotate_code=-1, int flip_code=-2){
pxp_handler* handler = (pxp_handler*)get_pxp_handler();
return handler->resize(_src, _dst, dsize, fx, fy, rotate_code, flip_code);
}/*! @brief PXP process surface buffer pixel format. */
typedef enum _pxp_ps_pixel_format
{
kPXP_PsPixelFormatRGB888 = 0x4, /*!< 32-bit pixels without alpha (unpacked 24-bit format) */
kPXP_PsPixelFormatRGB555 = 0xC, /*!< 16-bit pixels without alpha. */
kPXP_PsPixelFormatRGB444 = 0xD, /*!< 16-bit pixels without alpha. */
kPXP_PsPixelFormatRGB565 = 0xE, /*!< 16-bit pixels without alpha. */
kPXP_PsPixelFormatYUV1P444 = 0x10, /*!< 32-bit pixels (1-plane XYUV unpacked). */
kPXP_PsPixelFormatUYVY1P422 = 0x12, /*!< 16-bit pixels (1-plane U0,Y0,V0,Y1 interleaved bytes) */
kPXP_PsPixelFormatVYUY1P422 = 0x13, /*!< 16-bit pixels (1-plane V0,Y0,U0,Y1 interleaved bytes) */
kPXP_PsPixelFormatY8 = 0x14, /*!< 8-bit monochrome pixels (1-plane Y luma output) */
kPXP_PsPixelFormatY4 = 0x15, /*!< 4-bit monochrome pixels (1-plane Y luma, 4 bit truncation) */
kPXP_PsPixelFormatYUV2P422 = 0x18, /*!< 16-bit pixels (2-plane UV interleaved bytes) */
kPXP_PsPixelFormatYUV2P420 = 0x19, /*!< 16-bit pixels (2-plane UV) */
kPXP_PsPixelFormatYVU2P422 = 0x1A, /*!< 16-bit pixels (2-plane VU interleaved bytes) */
kPXP_PsPixelFormatYVU2P420 = 0x1B, /*!< 16-bit pixels (2-plane VU) */
kPXP_PsPixelFormatYVU422 = 0x1E, /*!< 16-bit pixels (3-plane) */
kPXP_PsPixelFormatYVU420 = 0x1F, /*!< 16-bit pixels (3-plane) */
} pxp_ps_pixel_format_t;
#define zip_v(v, bits, shift_l) ((v >> (8 - bits)) << shift_l)
#define RGB2RGB565(r, g, b) \
(zip_v(r, 5, 11) | zip_v(g, 6, 5) | zip_v(b, 5, 0))
typedef struct {
   union {
      rgb_clip_t rgb_clip[4];
        uint8_t rgb[12];
        uint32_t rgbx4[3];
   } rgb_rgb565;
} color_t;

int RGB888toRGB565_struct(uint32_t *prgb888, uint32_t *prgb565, uint32_t pixCnt) {
   color_t color;
   uint32_t rgb565x2[2];
   while (pixCnt >= 4) {
      memcpy(color.rgb_rgb565.rgbx4, prgb888, 12);
      rgb888+=3;
      rgb565x2[0] = RGB2RGB565(color.rgb_rgb565.rgb[2], color.rgb_rgb565.rgb[1],
                       color.rgb_rgb565.rgb[0]) |
                       RGB2RGB565(color.rgb_rgb565.rgb[5], color.rgb_rgb565.rgb[4],
                       color.rgb_rgb565.rgb[3]) << 16 ;
      rgb565x2[1] = RGB2RGB565(color.rgb_rgb565.rgb[8], color.rgb_rgb565.rgb[7],
                       color.rgb_rgb565.rgb[6]) |
                       RGB2RGB565(color.rgb_rgb565.rgb[11], color.rgb_rgb565.rgb[10],
                       color.rgb_rgb565.rgb[9]) << 16 ;
      memcpy(prgb565,rgb565x2,8);
      prgb565 += 2;
      pixCnt -= 4;
   }
   return 0;
}

void bgr2rgb565(cv::InputArray _src, cv::OutputArray _dst, uint32_t image_len){
   Mat src = _src.getMat();
   _dst.create(src.size(), CV_16U);
   Mat dst = _dst.getMat();
   uint16_t *dst_rgb16 = (uint16_t*)dst.data;
   uint8_t  *src_rgb8 = src.data;
   RGB888toRGB565_struct((uint32_t*)src_rgb8, (uint32_t *)dst_rgb16, image_len);
}
最终的pxp_handler::resize函数如下:
int pxp_handler::resize(cv::InputArray _src, cv::OutputArray _dst, cv::Size dsize, float fx, float fy, int rotate_code, int flip_code){
   Mat src = _src.getMat();
   Mat dst = _dst.getMat();
   if(src.data == dst.data || dst.data == nullptr){
   // only 90/270 need create new one
   if((rotate_code == ROTATE_90_CLOCKWISE) || (rotate_code == ROTATE_90_COUNTERCLOCKWISE))
      _dst.create(Size(dsize.height,dsize.width),src.type());
   else
      _dst.create(Size(dsize.width, dsize.height), src.type());
      dst=_dst.getMat();
   }
   uint32_t src_w = src.cols, src_h = src.rows, src_c = src.channels(), src_ptr = (uint32_t)src.data;
   uint32_t dst_w = dst.cols, dst_h = dst.rows, dst_c = dst.channels(), dst_ptr = (uint32_t)dst.data;
   Mat tmp(src);
   if(src_c != 2){
      bgr2rgb565(src, tmp, src_w * src_h);
      src_ptr = (uint32_t)tmp.data;
   }
   PXP_CFG(dsize.width, dsize.height);
   PXP_SetProcessSurfaceScaler(PXP, src_w, src_h, dsize.width, dsize.height);
   WAIT_PXP_DONE();
   return 1;
}
这样一来,基于PXP的优化代码就已经编写完毕了。下一步就是用事实说话来看看优化效果了,由于前几期中已经讲过如何构建一个基于OpenCV的测试工程了,这里就直接开始测试即可。
还是去手机里找张图片,这是一张500*500的彩图,作为测试样本:
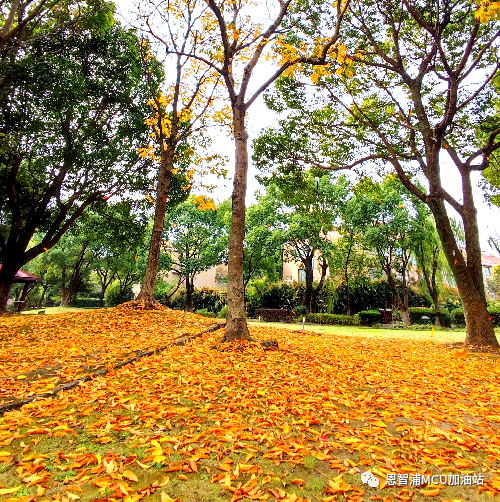
将其resize到(320, 240), 看下各个条件下的运行时间:
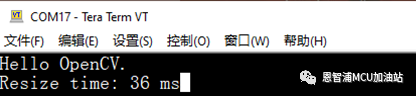
首先是CV默认算法:
接下来是优化算法:
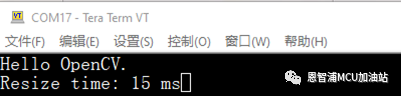
这里,还是要替可怜的PXP解释下的,15ms很大程度上是被RGB24转RGB565的软件算法给拖累了,实际上PXP只需要大概7ms左右。不过,相比较OpenCV的原始代码,优化后的代码节省了21ms的运行时间,性能提升了58%。
终于是到了说再见的时刻,时至今日,我们的《这个秋天系列》已经更新了5期了。本期迎来了最终章。
内容很多,也写出了感情,还是有些恋恋不舍的。。。。省略10k的感慨。。。。
终于可以下班收工啦!!!!
恩智浦MCU加油站
这是由恩智浦官方运营的公众号,着重为您推荐恩智浦MCU的产品信息、开发技巧、教程文档、培训课程等内容。

长按二维码,关注我们
END
更多恩智浦AI-IoT市场和产品信息,邀您同时关注“NXP客栈”微信公众号

NXP客栈
恩智浦致力于打造安全的连接和基础设施解决方案,为智慧生活保驾护航。
长按二维码,关注我们